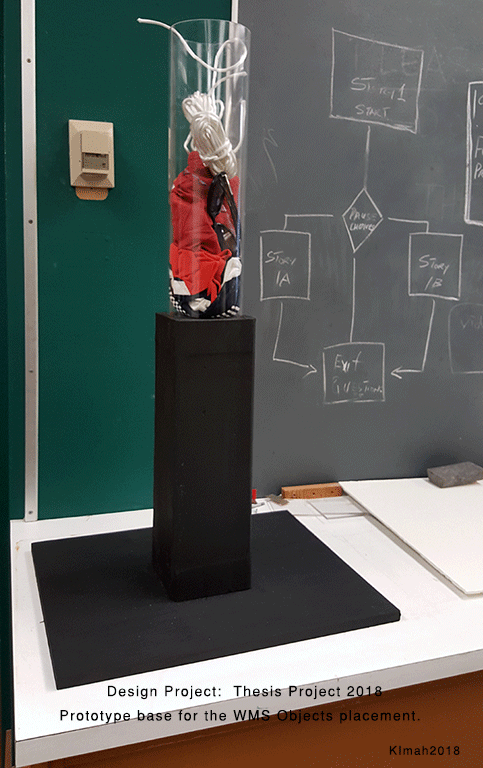
At the Woodshop: I am working with wood, Plexiglas and acrylic paint for the first time in the School’s Wood Shop making a prototype stand for the “Wear My Story” Thesis project. My cohorts (Elsie, Candy, and Hasinah) and I had a brainstorming session and came up with a design we think makes the most useful and practical sense for the planned project accessories. The team worked diligently on the initial paper design/concept of the “Objects collection/placement” table and now we are transferring the concept to physical rendering.
Our Thesis project centers on interactive video storytelling and sensor embed physical objects that connect the user and the storyteller in the video. We have a design provision for a place to store the physical objects, which would serve as the initial launching pad for each story; When a user approaches the installation, they are welcome and are introduced to a set of physical objects and given the option to pick an object from the set of items. Each item has a RFID(Radio Frequency id) sensor embedded in it to help start and control the sequence of the video.
To make the table stand, we began by drawing and/or sketching the table idea. We placed a few items on the mock design to get practical and additional concept ideas. We measured the required dimensions for both the table and table-contents. Then we took the idea to the Wood shop where the main fun began! First, we located a recycled (dead) block of wood and placed it against a Plexiglas cylinder-shaped container to gauge fitness and look/feel of pairing different materials together. With luck, our first option worked. We cleaned the piece of wood and drilled a 5.75 inches circle on the top of the wood to house or connect the Plexiglas cone. Then, we cut the wood to the exact length (1.5ft) and attached a 7 x 5 inches wooden base to the bottom of the wood to act as the anchor base for the stand. Four nails were drilled into the bottom section to hold the wood. Once the two pieces were secured, we used sand-paper equipment to smoothen the rough edges of the woods and got them ready for painting.
This is the first time that I tried using the auto-sanding machine to sand or smoothen any material. I enjoyed the hands-on and the result of my practice. Also, a huge appreciation to Mike at the Wood Shop for all his help and participation in getting the prototype configured, cut and put together. We took the base outside and painted it with a black acrylic paint to get the finish look. Afterwards, the Plexiglas cone was connected to the wooden piece and viola, this part of the table was done. The next planned action would be to complete the top receptacle for the table and add a few LEDs and sensor tag objects.
