Blog

Events

The Maker Faire week is here, and I am excited! Maker Faire is an annual event that attracts makers, students, developers, the curious minded, people of all-ages, background, and dreams with aspiration in technology, science, and the environment. A place to discover and enjoy learning what others have made. My group and I visited the site a day early as planned; Thursday morning at 10:00 am, to setup for the official Opening Day event.

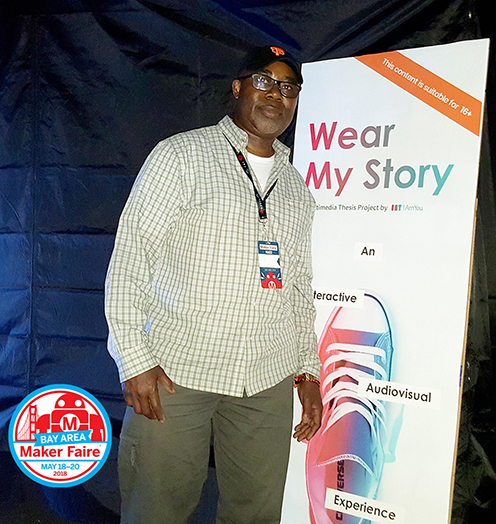
We arrived at the Maker Faire Bay Area 2018 with mixed excitement; the curiosity surrounding exposing the project to the public from around the world for the first time, and the anxiety from the unknown (mostly hidden surprises). We had two visible posters describing the installation mounted outside the 10 x 10 x 10 tent, and the objects table staged on one side closer to the entrance. The stage was set to test our proposition and see whether we have enough design research and technology to provoke awareness in how people interact with each other. Within minutes of the opening of the event, people began to visit and ask questions about the installation. It was the first time we had to explain to the public what the project was about and introduce them to the interactive non-linear storytelling. Slowly, and as more people came to visit, the wait time creeped to more than 10 minutes per experience. Most people didn’t mind the wait, while others chose to come back later. People began to randomly select the personal objects from the table and went inside the tent to reveal the interactive story. The stream of people stabilized and we became comfortable as time went by. Except for a few times the video froze, there were no real technical issues to worry about. But standing on a concrete floor for 3 days (the duration of the event) wasn’t fun. We enjoyed interacting with and the responses from users. In all, over 230 people went through the experience during the 3 days period.

Results

Measuring the result of the experience posed a challenge; we had no clear system to collect and produce useful statistical data on the experiment. Thus, we are left with depending on observations, user feedback and questionnaires to form opinions of the noted results. In retrospect, each topic should have at least, 30 or more specific questionnaires with ‘before’ and ‘after’ responses, creative ways of encouraging user unsolicited impression of their experience, and auto-generated count of visitors to the tent. Albeit, the limited sample size revealed enough evidence for us to assert that the Wear My Story experiment provokes awareness that may help to mitigate how people judge people at first encounter. We are confident and on the right track.

makerFairePic
Maker Faire, San Mateo California 2018


This slideshow requires JavaScript.

User Testing

The concept of “user testing” is exciting because it signifies that the prototype is about to be tested and modified accordingly. User testing is a significant process used by designers of different products to evaluate the usability and design completeness or functionality of a product or device. It is crucial in a user-centered design, and since the Wear My Story installation is interactive and dependent on users’ input and participation, this stage is a huge milestone for I and my team. As we prepare to launch this phase of the project, all aspects of the design is being looked at. For example, we are spending the rest of the week finalizing the sensor station and re-editing the documentary videos.

The Woodshop
In The Wood Shop at CSUEB.

RFID Reader Stand

I and my cohorts just finished constructing the RFID Reader Stand from the sketch drawing based on conclusions from initial brainstorming ideas. The RFID stand is about 3 feet high and 2.5 feet wide. The RFID Reader is installed on top of the stand. The material used is Plexiglas with acrylic paint to enhance the décor. A few LED lights are installed to reflect the presence of users and create aesthetical visuals.

WMS_ScanStation_Sketch-ideascanningStation-prototype 
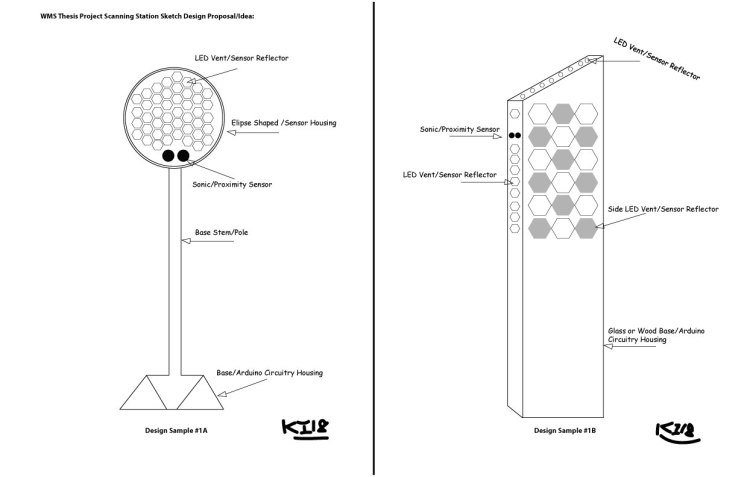
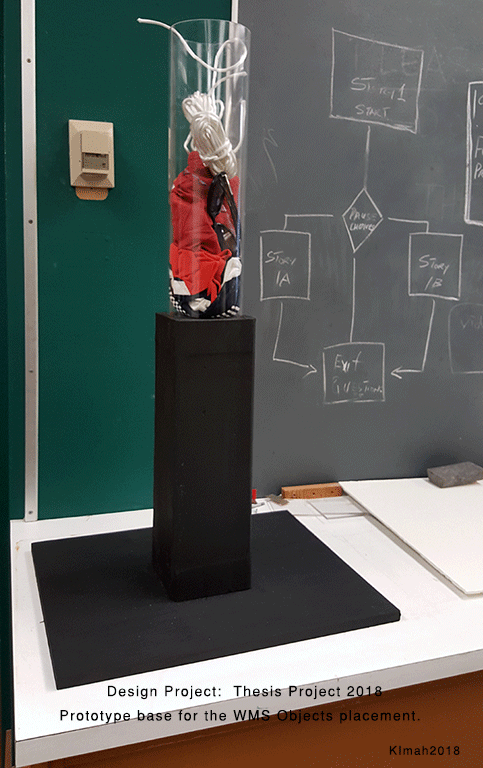
There are multiple technological devices installed inside the RFID stand: RFID Reader, Ultrasonic sensor, Arduino Microcomputer, breadboards, and USB adapters. In future notations, I’d expand on each of the sensor devices used to create the scanning station.

Working with Arduino Uno

For a while, I have been tinkering with micro devices and various sensors doing little projects. As I began to get serious with learning and understanding the functions and the relationship of Serial port communication, sensors, and micro devices to interactive projects, I began to seek help and expert knowledge including visiting Meet-Ups such as the Noisebridge in San Francisco.  I was at the “Arduino for Newbies” workshop to expand my knowledge on how Arduino device can be implemented in the “Wear My Story” interactive project that I am working on. I worked on the elementary level ‘blink LED’ library and tested a few proximity sensor codes I found online.

@Noisebridge

The Noisebridge experience was useful because I met a few wonderful and helpful people there. The Noisebridge positions itself as a ‘non-profit, hackerspace for technical creative projects’. I like the idea that the space welcomes everyone with or without prior  technical knowledge of the project they maybe interested in.  I spent most of the evening connecting jumper wires from the breadboard to the Arduino device, installing Arduino Ide libraries and testing the indicated functions; i.e., blinking LED and using Ultrasonic sensor to measure distance. I decided to use the Ultrasonic sensor concept for the bigger project.

The Arduino Uno is an Open Source personal computer hardware with extended programming libraries or data samples (pre-written by someone else and made available to the public) that can be used in projects. The Arduino device is defined as a single-board microcontroller that provides ways to sense and control objects in physical space. The board has sets of analog and digital pins (14 total pins). These pins connect various other devices to the Arduino for functionality and operability. The serial communication happens via USB. It uses 3V and 5V power input respectively for various connections/device communication.

Prototype: Physical Items Receptacle Stand for WMS project

At the Woodshop: I am working with wood, Plexiglas and acrylic paint for the first time in the School’s Wood Shop making a prototype stand for the “Wear My Story” Thesis project. My cohorts (Elsie, Candy, and Hasinah) and I had a brainstorming session and came up with a design we think makes the most useful and practical sense for the planned project accessories. The team worked diligently on the initial paper design/concept of the “Objects collection/placement” table and now we are transferring the concept to physical rendering.


Prototype for Objects Table


Our Thesis project centers on interactive video storytelling and sensor embed physical objects that connect the user and the storyteller in the video. We have a design provision for a place to store the physical objects, which would serve as the initial launching pad for each story; When a user approaches the installation, they are welcome and are introduced to a set of physical objects and given the option to pick an object from the set of items. Each item has a RFID(Radio Frequency id) sensor embedded in it to help start and control the sequence of the video.

To make the table stand, we began by drawing and/or sketching the table idea. We placed a few items on the mock design to get practical and additional concept ideas. We measured the required dimensions for both the table and table-contents. Then we took the idea to the Wood shop where the main fun began! First, we located a recycled (dead) block of wood and placed it against a Plexiglas cylinder-shaped container to gauge fitness and look/feel of pairing different materials together. With luck, our first option worked. We cleaned the piece of wood and drilled a 5.75 inches circle on the top of the wood to house or connect the Plexiglas cone. Then, we cut the wood to the exact length (1.5ft) and attached a 7 x 5 inches wooden base to the bottom of the wood to act as the anchor base for the stand. Four nails were drilled into the bottom section to hold the wood. Once the two pieces were secured, we used sand-paper equipment to smoothen the rough edges of the woods and got them ready for painting.

This is the first time that I tried using the auto-sanding machine to sand or smoothen any material. I enjoyed the hands-on and the result of my practice. Also, a huge appreciation to Mike at the Wood Shop for all his help and participation in getting the prototype configured, cut and put together. We took the base outside and painted it with a black acrylic paint to get the finish look. Afterwards, the Plexiglas cone was connected to the wooden piece and viola, this part of the table was done. The next planned action would be to complete the top receptacle for the table and add a few LEDs and sensor tag objects.


Interactive Design

For the past couple of years, I have been questioning and exploring the meaning of human-machine interaction and learning the basics of interactive installations. As a graduate student at CSU Eastbay, California, I am currently exploring (with three cohorts), how we might use interactive technology to mitigate or induce understanding in society. This project is crafted as a Thesis project code named “Wear My Story”.  

The concept of “Wear My Story” project is an art and interactive/augmented reality installation that uses technology in a playful way to explore and underscore the intersection between the human perception and treatment of others through storyline exposures to first impressions and the experience of walking in another person’s shoes.

Often, people judge others by first glance which creates misunderstandings, misconceptions, and stereotypical encounters. The underlying research question behind this project is “how might we use technology to mitigate social and cultural misunderstanding and promote peace and empathy?” The interactive experience would present diverse perspectives and understanding of human life journeys through narrative videos and audios and invite users to participate by using interactive objects to control the story. Thus, expose the user a specific experience.

The research would examine five areas of interactive experiences such as: Racism, Gender, Religion, Homelessness, and Shaming. The end result is to establish an understanding and generate empathy through the experiences of others to help mitigate or reduce the psychological and physiological outcomes rooted in real life situations. The core technology would be embedded infrared sensors, actuators, interactive programs and objects relating to the specific narrative presentation. 

The research spans collecting raw video footage and documentations, programing, building the installation, prototyping, and user testing. Conversely, the goal for the Fall Quarter is: (1) Write the interactive algorithm/code, (2) Define the sensors and hardware, (3) Create a minimum of 20 video clips, (4) Prototype and user testing, and (5) Design the physical space or installation.